Creating pre-paid electricity automation in home assistant
Apr 26, 2024In this guide, we will discuss how to create an automation for pre-paid electricity in Home Assistant. Since there is no built-in feature for this yet, we’ll have to get a little creative.
Card example:
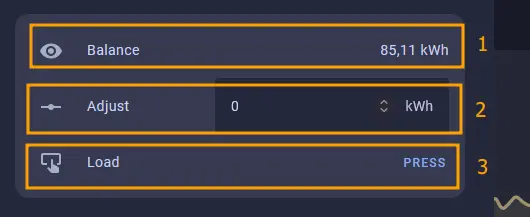
Explanation:
- This is the current pre-paid balance. It will be deducted every hour with automation that we will create later
- Any adjustment you made to the pre-paid balance, such as correcting the value, or adding the value after purchasing credit will be made here
- This button will confirm your adjustment in #2
Creating the helpers
As a prerequisite, you’ll need to have the sensor to count your total in kWh ready. If you haven’t, you can create a new helper from Settings > Device & Services > Helpers > Create Helper > Integration - Riemann sum integral sensor:
We’ll name this Total energy usage. For the input sensor, you should use your power meter sensor that measure in watt. Set precision to 2, and time unit to Hours.
Now, we need to create the four helpers required specifically for this project:
-
First helper, This will split your total energy usage into hourly usage. Go to
Settings > Device & Services > Helpers > Create Helper > Utility meter. We’ll name it “Hourly energy usage for pre-paid calculation”. Use the total energy usage sensor that we created earlier for input sensor. Set the Meter reset cycle to “hourly”. -
Second, go to
Settings > Device & Services > Helpers > Create Helper > Number. Name it “Pre-paid Balance”. Set maximum value to “999”, display mode to “input field”, step size to “0.01”, and unit of measurement to “kWh”. -
Third, go to
Settings > Device & Services > Helpers > Create Helper > Number. Name it “Pre-paid adjust”. Set maximum value to “999”, display mode to “input field”, step size to “0.01”, and unit of measurement to “kWh”. -
The last one, go to
Settings > Device & Services > Helpers > Create Helper > Button. Name it “Load pre-paid”.
Creating the automations
We need two automations for this.
- The first automation is to hourly deduct your pre-paid balance by using the value from “Hourly energy usage for pre-paid calculation”. Here’s the YAML:
alias: Deduct pre-paid
description: ""
trigger:
  - platform: time_pattern
    minutes: "59"
    seconds: "59"
    enabled: true
condition: []
action:
  - service: input_number.set_value
    data:
      value: >-
        {{ states('input_number.pre_paid_balance') | float | round(2) -
        states('sensor.hourly_energy_usage_for_pre_paid_calculation') | float |
        round(2) }}
    target:
      entity_id: input_number.pre_paid_balance
mode: single
- For the second automation, the trigger is the button press for the “input_button.load_pre_paid” helper. There are three actions that will happen when it’s triggered. The first action will input whatever number you set in the front end to the balance. Second action will reset the “Hourly energy usage for pre-paid calculation” to 0. And third action will reset the input box to 0. Here’s the YAML:
alias: Recharge pre-paid
description: ""
trigger:
  - platform: state
    entity_id:
      - input_button.load_pre_paid
condition: []
action:
  - service: input_number.set_value
    data:
      value: "{{ states('input_number.pre_paid_adjust') | float | round(2)}}"
    target:
      entity_id: input_number.pre_paid_balance
  - service: utility_meter.calibrate
    data:
      value: "0"
    target:
      entity_id: sensor.hourly_energy_usage_for_pre_paid_calculation
  - service: input_number.set_value
    metadata: {}
    data:
      value: 0
    target:
      entity_id: input_number.pre_paid_adjust
mode: single
Optional automation
If you’d like, you can create an automation to nofity you when your pre-paid balance is low. Here’s an example:
alias: Low electricity credit notification
description: ""
trigger:
  - platform: time_pattern
    hours: "*"
condition:
  - condition: numeric_state
    entity_id: input_number.pre_paid_balance
    below: 30
action:
  - service: [INSERT THE NOTIFICATION SERVICE FOR YOUR DEVICE HERE]
    metadata: {}
    data:
      message: Electricity credit is below 30 kWh!
mode: single
Creating the card
Add this to your configuration.yaml so that the balance will display as a text, not an input number. This should be under sensor:
  - platform: template
    sensors:
      prepaid_balance_display:
        friendly_name: "Pre-Paid balance display"
        unit_of_measurement: "kWh"
        value_template: "{{ states('input_number.pre_paid_balance') | float | round(2) }}"
Next, create an entity card as follows:
type: entities
entities:
  - entity: sensor.prepaid_balance_display
    name: Balance
  - entity: input_number.pre_paid_adjust
    name: Adjust
  - entity: input_button.load_pre_paid
    name: Load
That’s it! You can change the icons or modify the card to look nicer, of course ;)